FiLMiC Pro is an app that allows you to take manual control of your phone’s camera. If you’re taking a production class and your instructor asked you to buy FiLMiC Pro ($14.99 US), this is the page for you. If you’ve taken the CAMS technology survey, the system requirements part of this will be familiar. (If you haven’t, please take a moment to fill it in, especially if you have an Android phone.)
System requirements
iPhone
The FiLMiC Pro people say their app runs on any iPhone running iOS 11.1 or later. Download and install from the App Store. If you don’t have iOS 11, but you have a iPhone 6 or later, it should be able to make the iOS upgrade, although files might need to be deleted to make room.
Android
If you have an Android phone, start by reading FiLMiC Pro’s brief articles, Android device compatibility and Why Isn’t My Android Device Supported by FiLMiC Pro? The current version of FiLMiC Pro is 6.12.9, as of November 24, 2020. It requires Android 6 or later running on a compatible phone.
How do you know if your Android 6 or later phone is compatible with FiLMiC Pro?
- Open the Google Play app on your phone and search for “filmic pro evaluator.” (It’s free.)
- If Google Play on this Android phone won’t show you the Evaluator, the phone definitely isn’t compatible with FiLMiC Pro.
- If Google Play will show you the FiLMiC Evaluator, it’s a good idea to install and run the Evaluator. It will will tell you which features, if any, will be disabled on your phone when running the FiLMiC Pro camera app. Whether FiLMiC Pro will work on your phone depends on what features your faculty member needs you to use.
If the device is qualified, download and install FiLMiC Pro from the Google Play Store. (FiLMiC Pro’s Android support articles encourage Android customers to test it thoroughly within the Google Play Store’s 48-hour return period.)
FiLMiC Pro Quick Start Guide
- Spend a few minutes reading FiLMiC Pro’s own Quick Start Guide, (It’s also available from inside the app itself.)
- Watch Ashley Kennedy’s Intro to the FiLMic Pro app (11 mins) at LinkedIn Learning.
- Watch FiLMiC Pro’s v. 6 Jump Start Guide (16 mins)
Getting Started
Open the FiLMiC Pro app on your phone. The app may ask for system permissions to use the camera, microphone, and other services. You’ll need to grant the app access if you wish to continue with it.
Next, you’ll be presented with the main FiLMiC Pro screen. Turn the phone on its side so the picture is wider than it is tall — this is called landscape orientation. The rest of this guide assumes you’re holding the phone in landscape orientation.
Tap the manual control button in the bottom left corner of the screen. It will be faintly red when manual controls are on.
- Watch Epic Tutorials’ video, “Using Advanced Manual Controls in FiLMiC Pro v. 6” to get familiar with what we’ll walk through next.
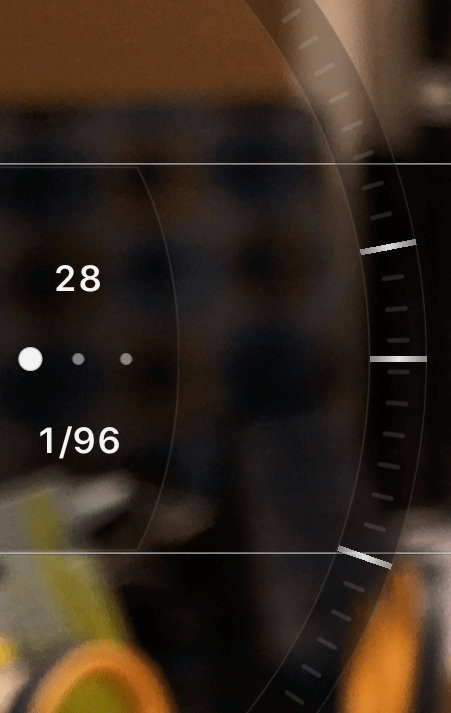
- Find the three white dots on the center left of the main FiLMiC Pro screen. (If you can’t see these, tap the color wheels at the bottom left of your screen.)
- Set ISO bias by tapping and dragging on the larger dot on the left. ISO bias tells the camera to stay within a certain range of ISOs: low, medium, or high.
ISO can control the brightness of your image, but it should be your last line of defense in setting exposure. The higher the ISO, the more a visual artifact called “noise” is generated in the image. Video captured at a high ISO will show a lot of noise and might not be usable. So, brightening video by ISO is always a trade-off. You should only raise your ISO when you are unable to add light or brighten the video via the exposure wheel.
Resolution
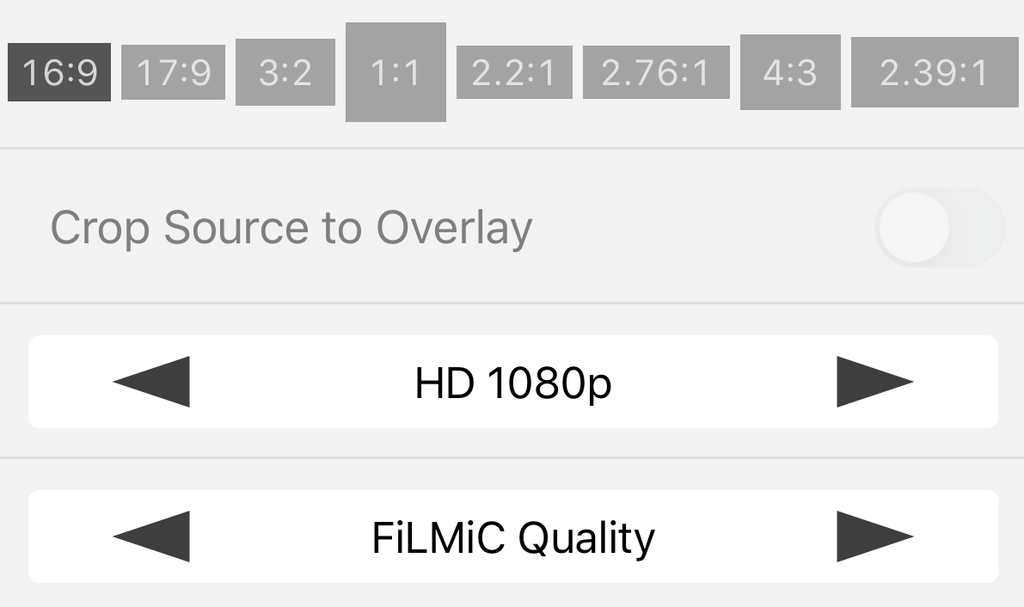
- Tap the button in the bottom right corner that looks like a gear or sprocket. -Tap “Resolution.”
- Select “16:9,” “HD 1080p,” and “FiLMiC Quality.”
- Scroll down a little and make sure High Efficiency Codec (HEVC) is not selected.
HEVC (actually H.265) is a relatively new type of video and not all editing software knows what to do with HEVC. To avoid problems later, make sure HEVC is not selected. Tap outside of this box to return to the menu.

Frame rate
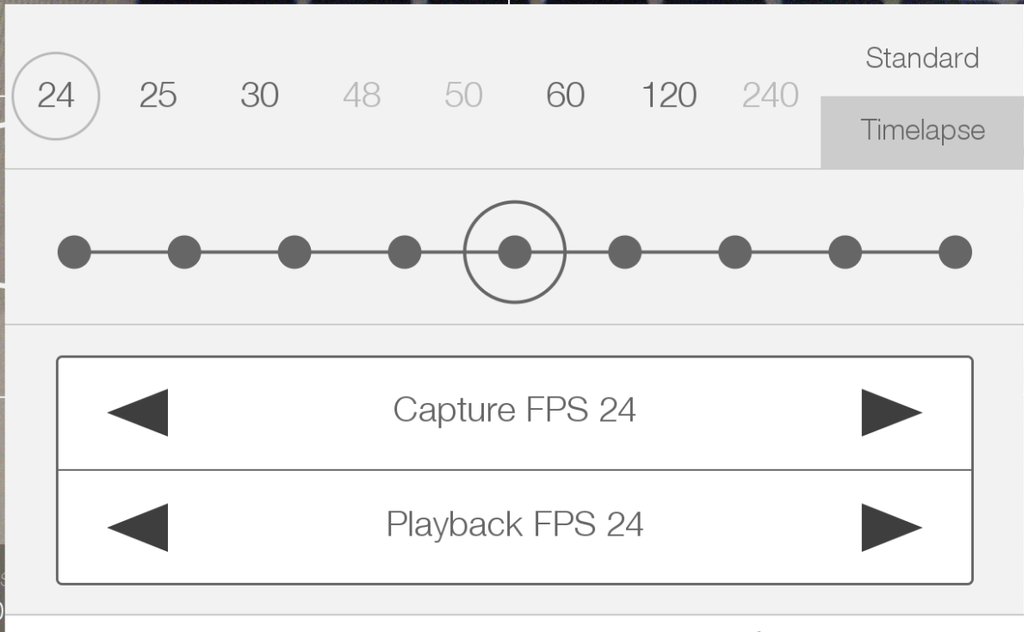
-Now tap the “FrameRate” button. Select “Capture FPS 24” and “Playback FPS 24.” Also make sure “standard” (and not “timelapse”) is selected.
-Tap outside the Settings box to close the frame rate settings.
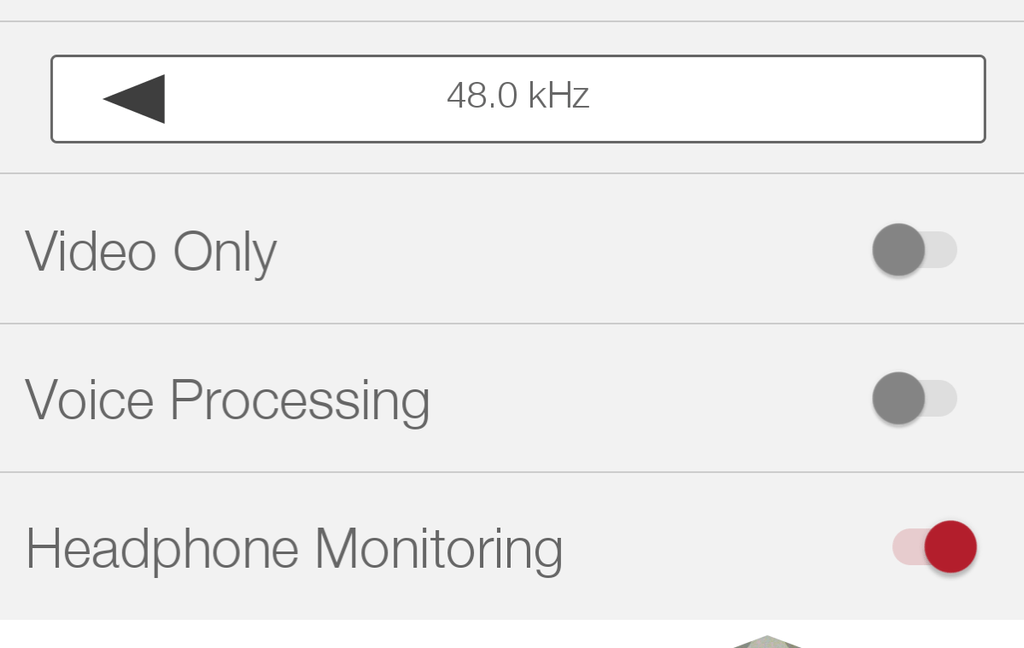
Audio
-Tap “Audio.”
-Make sure 48.0 kHz is selected.
-Make sure “Video only” and “Voice Processing” are turned off.
-Make sure “Headphone monitoring” is turned on.
-Scroll down. If you have the option, turn “Automatic Gain Correction” off.
White balance
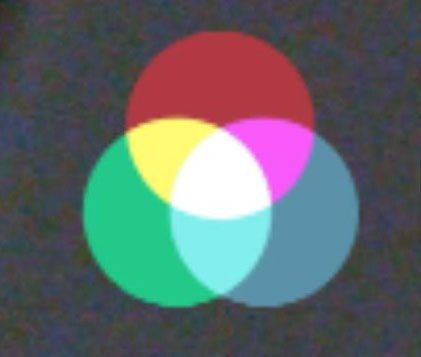
-Tap the overlapping colored circles in the bottom left of the screen:
-In the lower right corner of the control panel that appears, tap the “AWB” button until the button turns dark blue. As long as this button’s blue, the camera is constantly updating white balance, which cause very distracting color shifts in an image that can render footage unusable. It’s better to harness the camera’s accuracy but lock in white balance, and remember to change it when you go into different light.
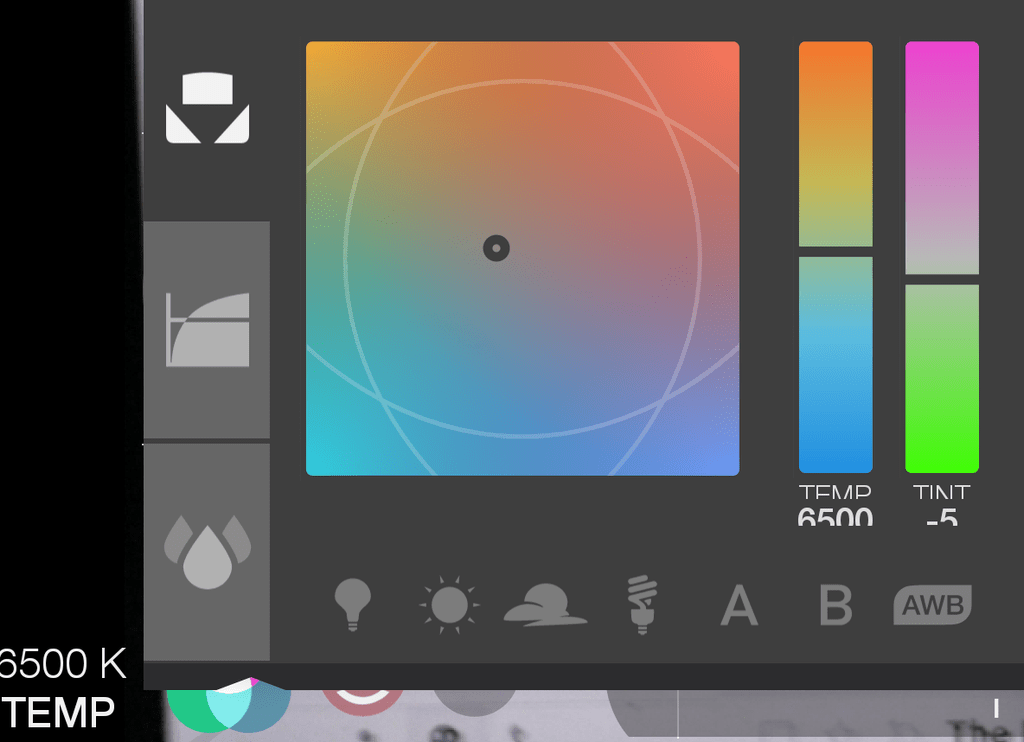
-Position the camera so that something either truly neutral gray, or all white, fills the screen, under the light you’re trying to white balance to. This can be an ordinary piece of paper.Without moving the camera, tap AWB again. It should turn red. Now you have locked the white balance to that specific lighting condition.
Exposure
-Adjust the exposure by dragging the exposure wheel on the left side of the screen up or down. Notice the image getting brighter and darker as you change this value.
ISO/Shutter speed
You should also notice these two numbers changing. The top number is the ISO (how much the image’s overall brightness is boosted) and the bottom number is the shutter speed: how long the shutter is open for each frame, expressed as a fraction of a second.
Since the cameras on most mobile devices are so tiny, they do not have an iris that allows for variable apertures. This means on phones we have only shutter speed and ISO–but not aperture–to work with in setting exposure.
You can lock down either of these values. Move your exposure wheel until the value you want to set is where you want it. Now tap on the value and it will stay constant. It’s important to lock your shutter speed so it isn’t changing throughout the shot.
To capture natural-looking motion, the shutter speed should be set to one over twice the frame rate. Shooting 24 frames per second, that’s a shutter speed of 1/48th of a second. If you don’t lock down your shutter speed it can go too high, which will result in unnatural-looking, choppy, strobe-like motion. This YouTube video has a good side-by-side comparison:
As mentioned earlier, also be careful of letting your ISO go too high. If that happens, you will get noise in your image. Noise is unwanted random variation in luminance and color: little specks of color and dots of light in an image. In real life, the object in this image is gray. Shot at high ISO, random pixels of red, green, and blue pixels interfere with one’s perception of gray. That’s noise.

Zebra stripes
Watch the Epic Tutorials video, “Using Live Analytics for Perfect Focus and Exposure in FiLMiC Pro V,” to get an introduction to using zebra stripes.

The red diagonal lines indicate that that part of the shot is overexposed. This means that detail in that region is blown out because it’s too bright. Avoid overexposing regions of your shots that are important to how your shot is composed. (It’s often okay if light bulbs or windows in the background are overexposed.)
The blue diagonal lines indicate that that part of the shot is underexposed. This means that detail in that region is lost because it’s dark. Also avoid underexposing the important regions of your shots. It’s okay if some shadows or dark objects are underexposed.
It can be difficult to get rid of all the diagonal lines. You might think of composition as all about framing–and framing is important indeed. But an equal part of the art of composing a shot is working within the technology’s limitations and being intentional about what’s in that properly exposed mid-range, and what else is too bright or too dark. What is this shot a picture of? What do you want to call the viewer’s attention to? That part of the image should be in focus, and neither over- nor underexposed.
Focus and Zoom
The ring on the right side of the screen can be used for focus or zoom. To change which one you are controlling, tap the word “focus” or “zoom.” Adjust these parameters by tapping and dragging on the wheel. Notice that as you adjust the focus, the shot moves between blurry and sharp. To get the focus right, you may want to use the Focus Peaking assistive tool.
Focus Peaking
Focus Peaking
Focus peaking works like zebra stripes for focus, but it puts a bright green line on things that are in focus. Have a look at this video for an introduction to focus peaking.
The green lines will show up over sharply changing detail, which will only happen for objects that are in focus. Once again adjust your focus and see how Focus Peaking makes it easier to see what’s in focus and what isn’t, especially in bright light.
Content Management System (CMS)
Take advantage of the fact that you can tell FiLMiC Pro to name your files a certain way, especially with the name of your project and which number take this is of a certain shot. You’re doing basic content management! This will help you keep your footage organized in post-production and make your life easier. Check out this video:
Audio
To record audio you can use, you’ll need to set good record levels. On the right side of your screen, you will see a meter that tells you how loud your audio is. At the top, there’s a number with “dB” next to it–that stands for decibels. This ranges from negative infinity (silence) up to 0 (the loudest sound your device can represent).

You can change the sensitivity of your microphone by dragging the slider at the lower center of your screen. This is how you will control the level of your sound.

Your main goal is to avoid peaking. Peaking happens when the audio level reaches the top of the range (0dB). When that happens, the audio distorts, which sounds ugly, will be distracting in your project, and can’t be fixed later. If you look at the waveform of distorted audio, you can see what looks as though the tops of the sound waves have been chopped off.

To avoid this, we’re going to give ourselves some headroom. We are going to watch the performance and these meters closely, and make sure the loudest parts land roughly 12dB short of the top of the range (0dB). That way, if our actor decides to give an unexpectedly loud delivery for the real thing, it won’t ruin the take.
Have your actor give a practice delivery of their line. Whether it is too high or too low, move the slider at the bottom to your best guess of where it should be so that you can capture a peak of roughly -12dB. Repeat this as many times as necessary to get your highest peak close to -12dB. It doesn’t need to be exact, it’s just a rule of thumb.
If you are recording non-dialogue sounds, you can do roughly the same thing. Meter the sound and change the level until the highest peak is around -12dB.
Positioning the camera
To set up the camera so that it is not shaky or unstable, find an object to brace against. Try pressing the edge of your mobile device flat against a door frame or table. If it’s safe to do so, you can get an especially stable shot looking outdoors without a tripod by gently pressing your camera up to a window. Don’t press hard, just hold it steady. Please use caution around all glass.
Recording
To begin recording, tap the white circle in the bottom right corner of the screen. The circle will turn red and the timecode in the lower center of your screen will begin counting up.
To review recorded media, tap the triangular play button next to the record button. Tap on a piece of media to play it back.
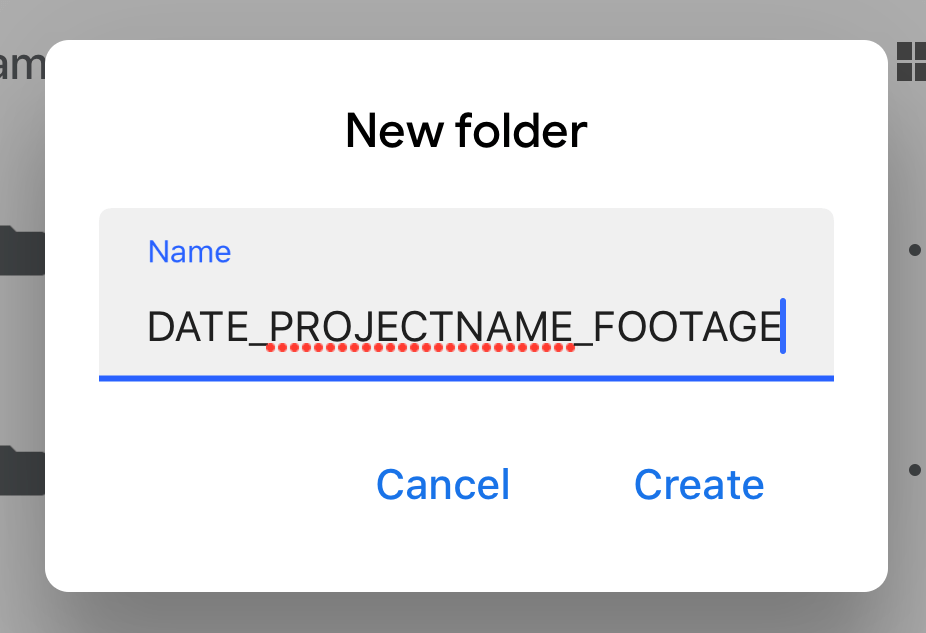
Transferring footage to Google Drive
You will need to download the Google Drive (Android link; iOS link) app on your mobile device. Once the app is installed, sign in using your Carleton credentials. Create a new folder with an informative name such as “DATE_PROJECTNAME_FOOTAGE.” Return to FiLMiC Pro.
Tap the triangular play button next to the record button to inspect your media. To select media for transfer, tap the checkbox at the bottom of the panel. Tap each piece of media you wish to transfer. When you are ready to transfer, tap the symbol with an arrow pointing up.

Select “Drive” from the options.

Follow Google Drive’s instructions to upload your media to the folder you created in your drive.

Additional Resources
- FiLMiC Pro owner’s manual
- FiLMiC Pro product support pages
- FiLMiC Pro video tutorials
- How To Perform Automated Focus Pulls
- 5 Tips for More Reliable Shooting with FiLMiC Pro V6