
Please watch and read all of this content and ask any questions you have.
1. Introduction
2. Principles
3. Safety
–Read Carleton Emergency Information in its entirety. (The current version is available only online. Any flipbooks are substantially out of date.)
–Sign up for CarlAlert emergency notifications. (Log in using “Single Sign On”). If you’ve signed up before, is your information still current? This is a good time to check.
–Install the CarlAlert mobile safety app by Everbridge.
–Read the Weitz Emergency Evacuation protocols. Summary:
- Turn house lights on full.
- Stop the movie if you’re in the booth.
- Announce to the audience that everyone needs to leave the cinema. Remind them where the exits are.
- Exit the cinema and go to:
-lower level corridors, in case of severe weather;
-Central Park, in case of fire.
–Look up the evacuation assembly area and emergency shelter area for the Weitz. What are they?
–Read 2020 Minnesota State Fire Code section 403.2.2 Announcements:
In theaters, motion picture theaters, auditoriums and similar assembly occupancies in Group A used for noncontinuous programs, an audible announcement shall be made not more than 10 minutes prior to the start of each program to notify the occupants of the location of the exits to be used in the event of a fire or other emergency. Exception: In motion picture theaters, the announcement is allowed to be projected on the screen in a manner approved by the fire code official.
–Go to the Weitz and find the telephone in the hall outside the back door of the cinema (upstairs). In case of emergency, use it to call 911 if it’s safe to place the call from there. 911 dispatchers will know where you’re calling from (unlike when a call is placed from a cell phone). Press 8 to dial out, then 911.
–Read this draft Job Action Sheet for Crowd Managers and take this quiz about it. The most important thing about the role of crowd manager that hasn’t already been covered in the above projectionist training is that it is your job to limit attendance to capacity (212) and keep aisles clear.
4. Copyright
Read all of SAO’s Copyright FAQs.
5. The Classroom System
6. The Cinema System
Weitz Cinema’s lighting presets:
1 Cinema Night
As dark as it gets (though still safety lights in aisles, landings, and vestibules). Use for showing movies.
2 House on Half
Use before showtime and after credits for people to see their way. Also, on your way out the door at the very end of the evening, please choose this so it’s not pitch dark when other people walk in.
3 Spotlight on Podium
Use when there’s someone presenting at the teaching station.
4 Spot on Podium and Front Aisle
Use for panel discussions, Q&A, or when the presenter walks away from the teaching station.
5 House on Half and Front Aisle
Use this for panel discussions, or if the presenter wants more light to see the audience by.
6 All on Full
As bright as it gets. Use this if someone’s looking for something they lost or doing maintenance work on the room.
7 Spot on Podium (Brighter)
Same as Spotlight on Podium (3), but brighter for PEPS when they’re shooting video of a speaker.
8 Spot on Podium Brighter With House on Full
Same as 7 but with house lights up for PEPS when they’re shooting video of a speaker and the audience.
9 Cinema Twilight
Darker than House on Half (2), but brighter than Cinema Dusk (12). Useful for notetaking in class screenings.
10 duplicate instance of Cinema Night
11 Front Aisle Only
Same as 4 but the podium is dark.
12 Cinema Dusk
Darker than Cinema Twilight (9) but not as dark as Cinema Night. Use during credits or an open house. Can also work for notetaking during screenings.
This list is posted on the lighting controller in the projection booth.
7. Quick Projector Check
Log into the Quick Projector Check from anywhere and practice answering the questions on it. (Go all the way to the last page but please don’t actually turn in the form when you’re using it for practice.)
8. The Screening Report
Log into the Cinema Screening Report from anywhere and practice answering the questions on it. (Go all the way to the last page but please don’t actually turn in the form when you’re using it for practice.)
9. Timed Text
“Timed text” is a general term for text that appears onscreen in a way that is timed with dialogue and action. One form of timed text is subtitles, used to show a movie to an audience who otherwise wouldn’t likely understand dialogue in it based on language. Jean-Luc Godard’s 1960 À bout de souffle (better known to Anglophone audiences as the movie Breathless) has dialogue in French, but is commonly shown in the U.S. with English subtitles.
Another form of timed text is captions, used to show a movie to an audience including people who otherwise would have difficulty understanding dialogue in it based on hearing impairment. There are two types of captions: closed and open. Closed captions can be seen only with additional equipment, such as glasses or handheld devices, requested by individual audience members.
Open captions are visible anywhere in the house without additional equipment. When captions or subtitles are burned into the video image, they can be considered a form of open captioning in the sense that they are visible everywhere in the cinema without additional equipment.
The name of a DCP looks like a lot of numbers and letters at first but, if the name’s been given according to convention (as most are), all those numbers and letters mean something. A well-formed DCP name tells projectionists around the world so much that it’s in distributors’ interest that their DCPs follow the convention: reduce confusion, lower the number of support calls. Take time now to review online the thirteen elements of the InterSociety Digital Cinema Forum’s naming convention. When you’re in action, refer to the DCP naming convention chart posted in the cinema control booth. (When you’re at the helm in the booth, looking out the port glass window into the cinema, it’s on the large equipment rack immediately behind you.)
The fifth element of the DCP naming convention is Language and it concerns captioning. Let’s look at sample DCP names:
Frozen2_FTR-1-2D_S_EN-EN-CCAP_US-PG_51-HI-VI-Dbox_2K_DI_20191027_DTB_IOP_OV
The first EN indicates the dialogue is primarily in English, the second EN indicates it has English subtitles, and CCAP indicates they are closed captions, available only with additional equipment.
Dune-Pt1_FTR-3D-45fl_S_EN-XX_OV_51-HI-VI-Dbox_2K_WR_20210903_DTB_SMPTE-3D_OV
EN indicates the dialogue is primarily in English, XX indicates it has no subtitles.
SummerOfSoul_FTR_F_EN-EN-OCAP_OV_51-HI-VI_2K_SLP_20210616_PXB_SMPTE_VF
The first EN indicates dialogue is primarily in English, the second EN indicates it has English subtitles, and OCAP indicates they are open captions, visible everywhere in the cinema without additional equipment.
The ISDCF Convention says, “If the Language Code is upper case, the subtitles are generated in real time by the projector. If the Language Code is lower case, the subtitles are burned into the image already,” so a DCP of Breathless with FR-EN-CCAP or -OCAP in the fifth position of its name would indicate that the DCP includes an XML file with timed text in it, while a different DCP of Breathless with fr-EN in the fifth position of its name would indicate that English subtitles are part of the actual video files that make up the DCP with no reference to a separate XML file.
10. Showcraft
At screenings, you take everything you’ve learned and put it all together. Showcraft is the art of putting something onstage (or screen) with panache. As projectionist, you crafting the audience’s moviegoing experience. Some basic rules of cinema showcraft:
-When someone’s speaking on stage, illuminate them and make sure they’re using a mic.
-Don’t start the movie until the lights go all the way off.
-When showing something from computer, use side-by-side monitor arrangement (not mirror mode) so the audience doesn’t see the desktop, icons, dock, etc., but only the movie.
-MOVIE LOVERS LET MOVIE LOVERS WATCH CREDITS IN THE DARK
Don’t stop the movie or bring the lights up until the credits end.
-When you bring the lights up, only go to house on half (not all the way to house on full).
11. The Quiz
Take the Weitz Cinema Projectionist quiz. Must score at least 80% correct to pass. Please retake if necessary.
12. Demonstrate Proficiency
Email Shannon Lien to arrange a time to demonstrate proficiency in the cinema. Here are your instructions:
You will be the projectionist for a very short movie. One of us will let you into the booth. Be sure to fill in the Cinema Screening Report form as you go–it is your step-by-step guide. Do fill it all the way in to the end and turn it in for today’s proficiency demonstration. You’re welcome to run a Quick Projector Check while getting ready for this demonstration of proficiency, although you’re not obliged to.
You’ll need to sign into the Christie with the credentials you find on the Post-It note on the Christie touchscreen. The DCP named MAKINGGRAUTFIT_TST_C_EN-XX_US-GB_51_2K_CRL_20211104_CRL_SMPTE_OV containing the movie is already ingested in the media block.
Please project this movie for the demonstration audience (Office of the Director of the Arts staff) just as you would for the audience of an actual screening, including all pre-show checks and notifications.
Someone playing the role of an event host will need a working wireless handheld mic with which to address the audience. Personnel on hand will stay “in character” during the screening, so be sure to ask any questions before your time slot.
Proficiency is not evaluated on how quickly a movie gets on screen but on how thoroughly all duties required for a screening are performed. This is an all-systems check, not limited to technology.
Putting it all together
You’re going to run a screening of a very short movie to demonstrate proficiency. What does that look like? Same as a real movie, just shorter:
1. Set lights to House on Half.
2. Sign into the iMac in the booth.
3. Start filling in the screening report, including checking all exits.
4. Turn on the lasers.
5. Load the DCP MakingGrautfit and test it, picking the best aspect ratio and audio level by making a change, watching and listening, and repeating.
6. Re-cue the DCP to the beginning.
7. Start showing the Fire Marshal’s notice. (Pro tip: try using the iMac.)
8. Check all the exits for obstructions and continue filling in in the screening report.
9. At showtime, set lights to Cinema Night.
10. After the lights have gone all the way to Cinema Night, play the movie.
11. After the end credits have finished playing completely, bring up the light. (House on Half if people are leaving, or to one of the Spotlight cues if there’s somebody talking on stage.)
12. Turn off the lasers.
13. Finish filling in the screening report.
14. On your way out, make sure lights are set to House on Half.
12. More information
-The sweet spot in any cinema is the seat where a person looking straight ahead is looking at the center of the screen, from both left to right and top to bottom. This is where the technician sits who calibrates the digital cinema sound system, so if you sit there you’re hearing what they heard. In Weitz Cinema, this happens to be row K, seat 9.
Learn about multi-region DVDs and Blu-Ray discs and how to play them in Weitz Cinema.
-Haven’t for a while, but sometimes we play content from NTLive in the UK.
-Here are the channel assignments for the cinema sound system, which can come in handy for troubleshooting:
INPUTS
9 left L
10 right R
11 center C
12 low frequency effects LFE
13 left surround Ls
14 right surround Rs
15 left rear surround Lrs
16 right rear surround Rrs
OUTPUTS
first bank
1&2 L
3&4 C
5&6 R
7&8 LFE
second bank
1&2 Ls
3&4 Rs
5 Lrs
6 Rrs
7
8
-Learn more about:
aspect ratios
decibels
surround sound
digital cinema packages (DCPs)
ingesting content from a DCP
A DCP is folder with files in it. The file names, file types and their encoding and contents all have to be correct. In brief, there must be at least one audio file (24-bit WAV) and at least one video file (JPEG2000), both encoded as Material eXchange Format (.mxf). There also must be a VOLINDEX, an ASSET MAP, and two pieces of .xml: a PKL and a CPL. It’s all spelled out in the Digital Cinema System Specification.
The folder and the media share a name, which indicates, in abbreviated form, lots of useful information about the DCP, such as aspect ratio, resolution, and so forth. (You can read about the DCP naming convention and practice generating one.) The files must include media and metadata formatted correctly.
For the vast majority of titles played, we don’t have to worry about these things, but it’s important to recognize and respect them. Since a DCP is just a folder with files in it, we can receive it from a distributor in a couple of different ways. The most typical (and favored) way is on a correctly-formatted Data Express drive.
Some independent distributors offer us a link to download the DCP. And occasionally they ship us an ordinary external hard drive. Our campus network is very fast but, when downloading a large amount of data from someone else’s server over the open internet, speeds vary widely. If provided a download link, it’s best to download it to a Data Express drive. Make sure the drive has enough capacity that, when the new DCP is on it, there’s still at least 30% free space. (Once ingested and screened, there’s no reason to keep old DCPs around. If there’s still an old DCP hanging out on one of our Data Express drives, it’s important to throw it away.) And it’s really valuable to do a checksum, comparing the total size of the DCP provided with what actually ended up on the drive.
If provided an ordinary hard drive, it has to be able to make a USB-A connection, either with a cable provided, or an adapter already on hand. Whatever drive is used, it must be formatted correctly.
- Log into the projector with Manager credentials or higher.
- Connect the media to the projector.
Data Express drive
Take the drive out of its reusable cardboard shipping box, pop it in the slot in the front of the rack the projector sits on, and follow the instructions below.
Ordinary hard drive
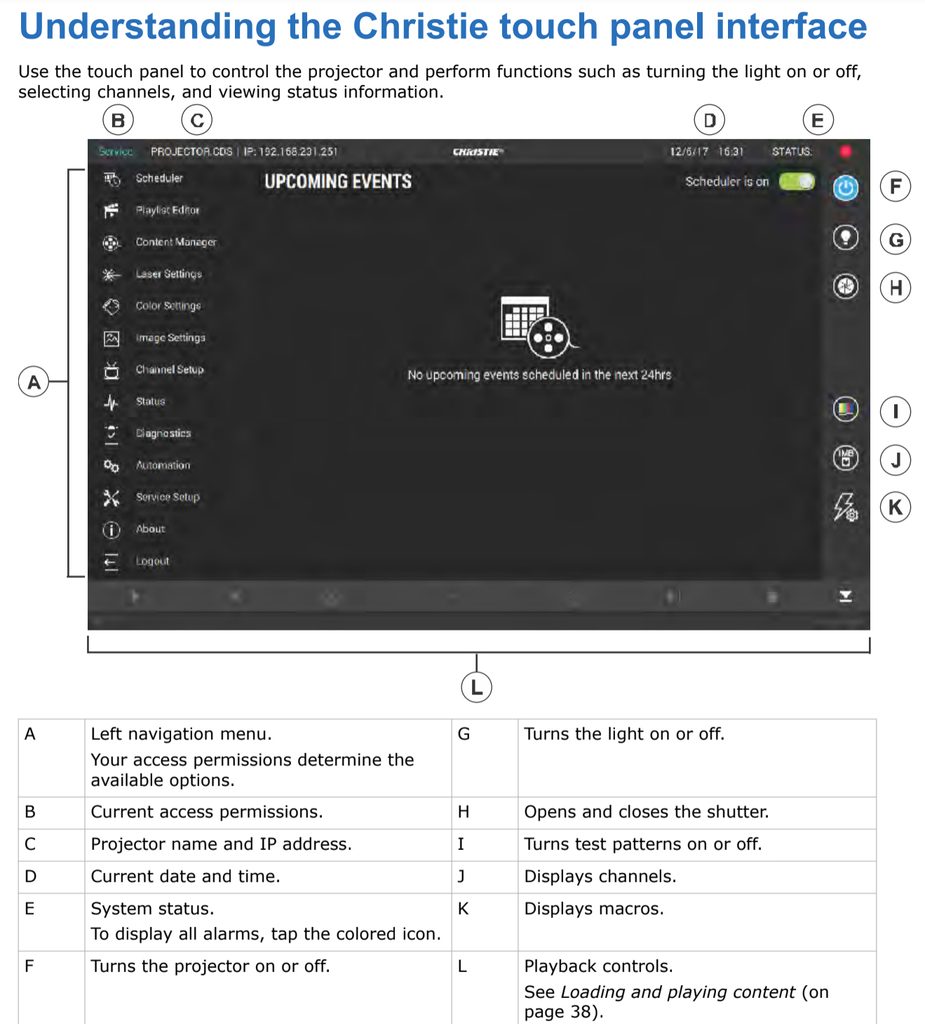
Take the hard drive out of whatever it was shipped in and connect it to the USB-A Ingest port on the side of the projector. - On the Christie touchscreen, in the left navigation menu, tap Content Manager.
- Tap the Ingestible Content tab.
- In the Source list, select a source for the content. (Properly formatted ingest devices connected to the projector are automatically added to the Source list.)
- In the Show list, select the content type.
- Select the checkbox to the left of the content you want to ingest, or select the empty box at the top of the column to select all content.
- Tap Ingest.
- To view the ingest progress, tap the Progress tab.
It’s not unusual for a feature-length DCP to be 120 GB, so that takes a while to ingest. If you have a drive firmly connected to the projector but the projector isn’t showing it in the Source list, there’s likely something wrong with the drive. It could be broken or improperly formatted. If the projector recognizes a drive but says it can’t import the content you want, there’s likely something wrong with the DCP.
Finally, it’s important to know whether the DCP is encrypted or not. If it is, you’ll need to ingest a KDM (“key”) in order to play content from the DCP. That key is either open-ended or specifies a range of dates and times when content from the DCP can be projected. Ingesting a key follows exactly the same procedure as ingesting a DCP. The key itself is a very small XML file, so ingesting it takes almost no time.
Where does a DCP go when ingested? It goes to the NAS, a storage array. Since this array has finite capacity, it’s also important to delete a DCP from it after we’re done screening it.